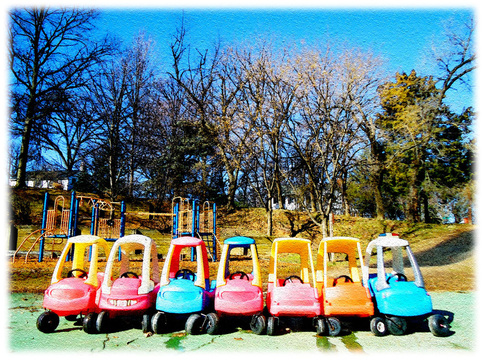
Today's tutorial comes from this site. It was a little difficult to follow exactly because they had an old version of Photoshop and they were using a PC. I used a fun picture I took while playing with my son at The Pit Park (everybody brings their old or unused toy cars). The effect wasn't exactly the same because I had to use a different texture than they did, but it was still useful because I learned how to feather a picture (New Layer, use the Marquee tool and then Inverse to get a frame, feather it using Modify-->Feather (25 pixels in my case), and then fill it with white using option + backspace.
I know I said that I would give you an eBook, but I need some more time than I currently have to produce something worth blogging about. So instead, I watched a tutorial on Lynda.com called Deke's Techniques to set up layer styles that mimic gold and silver. The text is still editable, which is really nice, although I have to readjust some of the sparkles if I move the text. I think it will be very useful for projects in the future. Deke only showed how to do the gold lettering; I then monkeyed with the style to get the silver coloring (not too hard). Stay tuned for eBooks hopefully next week.
Fixed an old photo in Photoshop. Used Color Balance, Levels, Vibrance, Reduce Noise, Despeckle, and fixed my uncle's eye and the scratches above my aunt's head. Before After
All right, I know it's Thursday night, but I had a lot of fun tweaking this tutorial. The grass, the caterpillar, and part of the sky are from my in-law's place (which is very beautiful), the road is from a trail my husband and I like to visit in Virginia, and the other part of the sky (the sunset part) is from Cinque Terre, Italy. The rest are images I found online. The original tutorial can be found here. People have done some other clever things with this concept. I think I am a surrealist at heart.
My goal is to do a tutorial a week. This is hard for me because I can spend hours and hours on just one project trying to make it better. So these shorter tutorials and not-perfect tutorials will be better for me. This is how to do a content-aware fill in CS5. It can save me tons of time. It's just a few clicks to do this: Use the magnetic lasso tool, Edit-->Fill, then clean up with the spot healing brush (J) and the clone tool (which is a million times better in CS5 than in CS3). It's not perfect (I'd fix the bottom of the pillow more), but I learned how to use it and I have a pillow ready for the next display. Pretty neat. I wonder what the algorithm in the programming is for this.
I was following a tutorial that showed how to create "the lomo effect" but I got a little lost in the tutorial and then just ventured out on my own with my photo. This was a photograph I took at the Jefferson Memorial. I have discovered that I love columns on buildings. Here is the before and after:
This tutorial (from here) was the most time- and layer-intense tutorial I've ever done. I learned a ton about different modes, especially Overlay. Many layers were duplicated and then had different modes applied to them. Especially useful in this tutorial was juggling the amount of layers I needed to create certain effects. The tutorial incorporated Adobe Illustrator as well (for the blast mark and the grid). Since I am weak in the Illustrator area it was helpful. I admit that after awhile I completely deviated from the original tutorial, making this poster into a vague commentary either about 1) NASA bombing the moon for "research" purposes, or 2) the recent kerfuffle over cutting the US space program. But it was mostly fun. Unfortunately, this blog doesn't allow huge file uploads, so a lot of the finer detail is washed out. But perhaps it adds to the retro-ness of it all.
I did this for my sister's birthday. Chitty Chitty Bang Bang was a childhood favorite. The face transplant, if you will, wasn't so hard, but getting the splashes of color in there was challenging. The Selective Color adjustment was the easiest and most helpful, and the Hue/Saturation adjustment helped tone it down. I had to create new layers for each colored piece; I'm sure there's an easier way, but I don't know of one.
|
Get UpdatesJamie ZvirzdinWhile I still edit science books and help kids create stories, I've moved my focus to writing science-based fiction and non-fiction stories. See more at www.jamiezvirzdin.com.
Categories
All
Archives
April 2016
Links for Self-Publishing Authors
How to Self-Publish a Book on Amazon 25 Things You Should Know about Self-Publishing How to Publish an eBook Lulu vs. CreateSpace Excellent Links for Learning
Learn Photoshop Learn Illustrator Learn Web Design Learn HTML Business Card Ideas Resources Free Fonts Identifont Ilovetypography Typographica Typophile COLOURlovers Clker.com Photoshop Textures We Love Brushes L&T Textures Tutorials Photoshop Actions |